<?xml version="1.0" encoding="utf-8"?><feed xmlns="http://www.w3.org/2005/Atom" ><generator uri="https://jekyllrb.com/" version="4.3.2">Jekyll</generator><link href="/feed.xml" rel="self" type="application/atom+xml" /><link href="/" rel="alternate" type="text/html" /><updated>2026-04-09T14:38:26+00:00</updated><id>/feed.xml</id><entry><title type="html">Writing a little x64 UEFI application</title><link href="/blog/2026/04/09/UEFI-Bootloader.html" rel="alternate" type="text/html" title="Writing a little x64 UEFI application" /><published>2026-04-09T00:00:00+00:00</published><updated>2026-04-09T00:00:00+00:00</updated><id>/blog/2026/04/09/UEFI-Bootloader</id><content type="html" xml:base="/blog/2026/04/09/UEFI-Bootloader.html"><![CDATA[<p>I’ve been fiddling about with UEFI recently, and trying to work out how I can write a UEFI application which could form the bootloader of an operating system. It seems like a pretty nice interface, so I’ll write a bit about it here.</p>

<blockquote>
  <p><strong>TL;DR:</strong> This post is the first in a small series in which I talk about bootloader and operating system development. In this one I talk about what UEFI is, how it works, how to write a simple UEFI application for the x64 architecture, compile it, and run it via emulation and on real hardware.</p>
</blockquote>

<p>Also, please do follow along with the code described in this post, which you can find <a href="https://codeberg.org/j4cobgarby/os_blog_posts/src/branch/main/1_helloworld">here!</a></p>

<blockquote>
  <p>Post contents:</p>
  <ul>
    <li><a href="#whatis">What is UEFI?</a></li>
    <li><a href="#entrypoint">How does UEFI invoke our code?</a></li>
    <li><a href="#protocols">How do we talk to UEFI?</a></li>
    <li><a href="#compilation">Compilation and Running</a></li>
  </ul>
</blockquote>

<h2 id="whatis">What is UEFI?</h2>

<p>When I’ve had a go at making an operating system before, I either wrote a tiny bootloader in a MBR boot sector, or used <a href="https://www.gnu.org/software/grub/">GRUB</a>. Most recently, though, I experimented with <a href="https://github.com/limine-bootloader/limine">Limine</a>, which is a bit more modern and <em>does</em> talk to UEFI to get the kernel booted and running. It also does a few cool things like exposing certain pieces of system information to the kernel through structs. I wasn’t entirely satisfied though; the whole reason that I’m interested in making my own operating system is to understand how every piece works, and so I need to write a proper bootloader first.</p>

<p>The “legacy” way of booting a computer is by writing a little piece (&lt;512 bytes) of code which sits at the beginning of a disk (paritioned with the <a href="https://en.wikipedia.org/wiki/Master_boot_record">MBR scheme</a>). The <strong>BIOS</strong> (which is the firmware installed on your motherboard, that has now been superceded by UEFI) looks for the bootstrap code and jumps to it when the computer is turned on. That bit of code “bootstraps” the operating system by reading in the OS code from the rest of the disk into memory, then jumping to it.</p>

<p>The thing is, it’s difficult and fiddly to write this kind of bootstrap code. Reading disks is only doable through a super low level interface; writing to the screen is not trivial; and the MBR partioning scheme limits the number of partitions. Also, maybe more importantly, it’s all extremely platform dependent, and not well documented. Like, how do you know if the system has video output? How do you find out the address of the memory to write to to draw pixels on the screen? How do you know the memory layout, or the attached the disks? It’s all pretty annoying, and the reason that I didn’t make a proper bootloader before.</p>

<p><em>But</em>, <a href="https://uefi.org/">UEFI</a> is the “modern” approach, and solves pretty much all of these problems. UEFI is a specification which describes a class of firmware which is able to load “UEFI Applications” (which are really just executable, structured pieces of code that do <em>things</em>), and clearly describes the following:</p>
<ul>
  <li>What state the CPU is in when control is passed to the UEFI application,</li>
  <li>What information is passed to the application,</li>
  <li>What services are available, and</li>
  <li>Which devices on the system support certain protocols (like disk access and video output), along with exposing simple function handles to use them.</li>
</ul>

<p>It’s all very nice, and makes developing bootloader code much easier and more similar to writing normal high-level code. It also makes it much simpler for me to get my bootloader running on my real computer, rather than just using an emulator.</p>

<p>The rest of this post will make up the first of a small series, in which I’ll describe interesting bits I run into while developing an operating system. This time I’ll just go over how to get set up with writing a UEFI application, how to compile it together, and run it. In the next post I’ll show how to load an executable ELF file from the disk (i.e. the kernel code) and pass control to it from the bootloader!</p>

<h2 id="entrypoint">How does UEFI invoke our code?</h2>

<p>The first thing to do is get a copy of the UEFI spec, which you can either view <a href="https://uefi.org/specs/UEFI/2.11/">as HTML</a> or download <a href="https://uefi.org/sites/default/files/resources/UEFI_Spec_Final_2.11.pdf">as a PDF</a> (my preference since I can then go through and annotate it). It’s crazily long, like 2,300 pages, but most of that is descriptions of specific protocols which you probably won’t even need to use. It’s organised pretty nicely for skim-reading. I’d say the most relevant sections for us are 1.6 (UEFI overview), 2.3.4 (x64 calling conventions), 2.4 (Protocols), and 4 (EFI System Table). We will then look up certain relevant parts of sections 7 (Boot Services) and various protocol sections when we want to use them. It’s not actually too much to read!</p>

<p>So the general idea is this: when you press the power button on your computer, the firmware (some UEFI implementation) will get going and look for a UEFI application to run. It first tries a user-specified boot order stored in on-chip nonvolatile memory, and if it can’t find anything suitable there it will instead look up the default path of <code class="language-plaintext highlighter-rouge">/EFI/BOOT{machine type}.EFI</code>, which in the case of x64 looks like <code class="language-plaintext highlighter-rouge">/EFI/BOOTX64.EFI</code>.</p>

<p>Once it finds the EFI file that it should boot, it locates its entry point and calls it as a function. The “handoff state” (UEFI spec 2.3.4.1) is such that an <code class="language-plaintext highlighter-rouge">EFI_HANDLE</code> is in the register <em>rcx</em>, and an <code class="language-plaintext highlighter-rouge">EFI_SYSTEM_TABLE*</code> in <em>rdx</em>. Our entry point is also allowed to return a value (UEFI spec 4.1.1) of type <code class="language-plaintext highlighter-rouge">EFI_STATUS</code>. If it returns, the UEFI firmware goes back to the boot menu. Since eventually our UEFI application will load and run an operating system, it will never actually return, in practice.</p>

<p>The system table which the firmware passes to “us” contains a bunch of information and function pointers(!), which I think is very exciting. The firmware implements some useful procedures which we can just call directly by looking through the system table!</p>

<p>Anyway, to start with, this “handoff state” together with a definition in UEFI spec 4.1.1 tells us that we can write our EFI entry point like so:</p>

<div class="language-c highlighter-rouge"><div class="highlight"><pre class="highlight"><code><span class="n">EFI_STATUS</span> <span class="nf">efi_main</span><span class="p">(</span><span class="n">EFI_HANDLE</span> <span class="n">ImageHandle</span><span class="p">,</span> <span class="n">EFI_SYSTEM_TABLE</span> <span class="o">*</span><span class="n">SystemTable</span><span class="p">)</span>
<span class="p">{</span>
    <span class="c1">// Do bootloading stuff</span>
<span class="p">}</span>
</code></pre></div></div>

<p>But wait, where do all these types come from? Well, luckily, UEFI spec 2.3.1 gives us a big table explaining what every type they use means. They sort of redefine lots of standard C types just to make sure everyone’s on the same page. For now, we just need to know that an <code class="language-plaintext highlighter-rouge">EFI_STATUS</code> is a native width unsigned integer (i.e. <code class="language-plaintext highlighter-rouge">uint64_t</code> on x64); an <code class="language-plaintext highlighter-rouge">EFI_HANDLE</code> is a <code class="language-plaintext highlighter-rouge">void*</code>, and an <code class="language-plaintext highlighter-rouge">EFI_SYSTEM_TABLE</code> is a particular struct (UEFI spec 4.3.1).</p>

<h2 id="protocols">How do we talk to UEFI?</h2>

<p>For today, let’s start with a really simple example. One prerequisite for a “proper” bootloader is obviously that we can print Hello World, right?</p>

<blockquote>
  <p>As an aside for a moment, let’s consider how we would do such a thing without UEFI. Imagine that we booted from BIOS instead, and we have a little &lt;512 byte chunk of assembly code. Well, that’s not a lot of space, so usually you plonk a bit more code somewhere else and load that as a second stage of the loader. But then, how to write text to the screen? Well, BIOS systems often support a compatability mode where on boot there is “VGA memory” at a certain address, with the VGA driver running in text mode. If you write some text into that memory, some characters will show up on the screen. So it’s not too hard to display some text, but it’s just a raw text buffer, and we would have to manually implement screen scrolling and even just moving the cursor. It’s a bit of a hassle.</p>
</blockquote>

<p>According to UEFI spec 4.3.1, the system table is a pointer to a struct with the following layout:</p>

<div class="language-c highlighter-rouge"><div class="highlight"><pre class="highlight"><code><span class="k">typedef</span> <span class="k">struct</span> <span class="p">{</span>
    <span class="n">EFI_TABLE_HEADER</span> <span class="n">Hdr</span><span class="p">;</span>
    <span class="n">CHAR16</span> <span class="o">*</span><span class="n">FirmwareVendor</span><span class="p">;</span>
    <span class="kt">uint32_t</span> <span class="n">FirmwareRevision</span><span class="p">;</span>
    <span class="n">EFI_HANDLE</span> <span class="n">ConsoleInHandle</span><span class="p">;</span>
    <span class="n">EFI_SIMPLE_TEXT_INPUT_PROTOCOL</span> <span class="o">*</span><span class="n">ConIn</span><span class="p">;</span>
    <span class="n">EFI_HANDLE</span> <span class="n">ConsoleOutHandle</span><span class="p">;</span>
    <span class="n">EFI_SIMPLE_TEXT_OUTPUT_PROTOCOL</span> <span class="o">*</span><span class="n">ConOut</span><span class="p">;</span>
    <span class="n">EFI_HANDLE</span> <span class="n">StandardErrorHandle</span><span class="p">;</span>
    <span class="n">EFI_SIMPLE_TEXT_OUTPUT_PROTOCOL</span> <span class="o">*</span><span class="n">StdErr</span><span class="p">;</span>
    <span class="n">EFI_RUNTIME_SERVICES</span> <span class="o">*</span><span class="n">RuntimeServices</span><span class="p">;</span>
    <span class="n">EFI_BOOT_SERVICES</span> <span class="o">*</span><span class="n">BootServices</span><span class="p">;</span>
    <span class="n">UINTN</span> <span class="n">NumberOfTableEntries</span><span class="p">;</span>
    <span class="n">EFI_CONFIGURATION_TABLE</span> <span class="n">ConfigurationTable</span><span class="p">[];</span>
<span class="p">}</span> <span class="n">EFI_SYSTEM_TABLE</span><span class="p">;</span>
</code></pre></div></div>

<p>For now, don’t worry about most of these fields. Focus specifically on the <strong>ConOut</strong> member, which is of type <code class="language-plaintext highlighter-rouge">EFI_SIMPLE_TEXT_OUTPUT_PROTOCOL</code>. A <em>protocol</em>, in UEFI, is a specific set of procedures that are supported by a certain <em>object</em>. (An object is a bit of an opaque and broad definition, by design. It can be anything which you can get a handle on, but is commonly a disk, other hardware device, filesystem, or file.)</p>

<p>This specific protocol, the <code class="language-plaintext highlighter-rouge">EFI_SIMPLE_TEXT_OUTPUT_PROTOCOL</code>, is supported by objects that support, uh, simple text output. Typically this is a screen, but there’s no reason I can think of that mean it couldn’t also be, for instance, a printer.</p>

<p>The protocol itself is defined by its own struct, whose members are all function pointers. You can see these all defined very clearly in UEFI spec 12.4.1. Since right now we’re only interested in outputting some text, there’s no need to fill in the precise definitions for <em>all</em> the function pointers, so we can define them as void pointers instead.</p>

<div class="language-c highlighter-rouge"><div class="highlight"><pre class="highlight"><code><span class="k">typedef</span> <span class="k">struct</span> <span class="n">_EFI_SIMPLE_TEXT_OUTPUT_PROTOCOL</span> <span class="p">{</span>
    <span class="kt">void</span> <span class="o">*</span><span class="n">Reset</span><span class="p">;</span>
    <span class="n">EFI_STATUS</span><span class="p">(</span><span class="n">EFIAPI</span> <span class="o">*</span><span class="n">OutputString</span><span class="p">)(</span>
        <span class="k">struct</span> <span class="n">_EFI_SIMPLE_TEXT_OUTPUT_PROTOCOL</span> <span class="o">*</span><span class="n">This</span><span class="p">,</span>
        <span class="n">CHAR16</span> <span class="o">*</span><span class="n">String</span><span class="p">);</span>
    <span class="kt">void</span> <span class="o">*</span><span class="n">TestString</span><span class="p">;</span>

    <span class="cm">/* ... some fields omitted here for brevity, but it's important they all be filled in */</span>
<span class="p">}</span> <span class="n">EFI_SIMPLE_TEXT_OUTPUT_PROTOCOL</span><span class="p">;</span>
</code></pre></div></div>

<p>If you want, you can think of this is an object oriented interface, where these function pointers are methods on a class. In this way it is simple to understand that the first parameter, <code class="language-plaintext highlighter-rouge">This</code>, is a pointer to the specific instance of a <code class="language-plaintext highlighter-rouge">SIMPLE_TEXT_OUTPUT_PROTOCOL</code>, which for us will be the one we find in the system table.</p>

<p>So with that said and done, let’s print some text! The next few blocks of code make up our entire <code class="language-plaintext highlighter-rouge">efi_main</code> entry point function; I’ll go over it line-by-line.</p>

<div class="language-c highlighter-rouge"><div class="highlight"><pre class="highlight"><code><span class="n">EFI_STATUS</span> <span class="n">EFIAPI</span> <span class="nf">efi_main</span><span class="p">(</span><span class="n">EFI_HANDLE</span> <span class="n">ImageHandle</span><span class="p">,</span> <span class="n">EFI_SYSTEM_TABLE</span> <span class="o">*</span><span class="n">SystemTable</span><span class="p">)</span>
<span class="p">{</span>
</code></pre></div></div>
<p>First, as before, we have to declare our entry point with a signature that matches that defined by UEFI. Here we introduce an important addition, though: we annotate our function with this <code class="language-plaintext highlighter-rouge">EFIAPI</code> symbol. This is simply a macro for <code class="language-plaintext highlighter-rouge">__attribute__((ms_abi))</code>, and instructs that the compiler that this function should be compiled as if using the Microsoft calling convention. The reason for this is because it is the calling convention that UEFI mandates, and the reason for <em>that</em> is that UEFI applications are <a href="https://en.wikipedia.org/wiki/Portable_Executable">PE</a> applications (a format developed by Microsoft). I don’t really know why UEFI selected Microsoft’s executable format (and therefore calling convention), but I guess they had to pick something. It just means we need to explicitly use the <code class="language-plaintext highlighter-rouge">ms_abi</code> attribute on any functions that UEFI “talks to”.</p>

<div class="language-c highlighter-rouge"><div class="highlight"><pre class="highlight"><code>    <span class="n">EFI_SIMPLE_TEXT_OUTPUT_PROTOCOL</span> <span class="o">*</span><span class="n">out</span> <span class="o">=</span> <span class="n">SystemTable</span><span class="o">-&gt;</span><span class="n">ConOut</span><span class="p">;</span>
</code></pre></div></div>
<p>Here we just retrieve the simple text output protocol instance from the system table. This bit’s pretty straightforward. If you want, you could also save it to a global variable so that it can easily be used if any other functions need to print things.</p>

<div class="language-c highlighter-rouge"><div class="highlight"><pre class="highlight"><code>    <span class="n">out</span><span class="o">-&gt;</span><span class="n">OutputString</span><span class="p">(</span><span class="n">out</span><span class="p">,</span> <span class="s">L"Hello, world!</span><span class="se">\r\n</span><span class="s">"</span><span class="p">);</span>
    <span class="k">while</span> <span class="p">(</span><span class="mi">1</span><span class="p">)</span> <span class="p">;</span>
<span class="err">}</span>
</code></pre></div></div>
<p>Finally, let’s actually do the thing! We’re using the protocol instance both as a table of functions to find the <code class="language-plaintext highlighter-rouge">OutputString</code> method, as well as passing it as the <code class="language-plaintext highlighter-rouge">This</code> argument in said method. The weird bit here to discuss is what’s going on with the string. Firstly, we declare the string with the <em>L</em> prefix, which produces a <em>wide</em> string literal within which each character is 2 bytes. We have to do this because it’s what the <code class="language-plaintext highlighter-rouge">OutputString</code> function expects (UEFI spec 12.4.3), and it is actually nice as it provides good unicode support. Then, we end our string with “\r\n”, which will look normal to Windows users and slightly odd to Linux users. The “\r” (carriage return) moves the cursor to the first column, and “\n” (line feed) moves the cursor down one line, potentially scrolling (UEFI spec Table 12.10). Think of them together as going to the start of the next line.</p>

<p>Finally, the infinite loop right at the end keeps control within our function, so that the machine doesn’t keep resetting back to the UEFI menu.</p>

<h2 id="compilation">Compilation and Running</h2>

<p>This function, along with definitions for the UEFI types used by it, are really all we need!</p>

<p>Overall, we want the following:</p>
<ul>
  <li>A disk (image) formatted using GPT partitioning. UEFI understands both GPT and the legacy MBR partitioning schemes, but GPT is better, so we’ll use it.</li>
  <li>A FAT filesystem on this disk. FAT is the required filesystem for UEFI to read and load UEFI applications from.</li>
  <li>Our compiled UEFI application, as a PE(32+) executable, sitting in that FAT filesystem at the path “/EFI/BOOT/BOOTX64.EFI”.</li>
</ul>

<p>Once all this is in place, in theory our disk image is ready to flash onto a USB stick and plug into our computer to boot from!</p>

<blockquote>
  <p><strong>Notice:</strong> <em>It might be worth mentioning here that running random code like this on your own machine <strong>can cause Bad Things</strong>, because the code runs at supervisor level and if something is written wrong it could erase your disk, corrupt things, or otherwise be a nuisance. For safety and also just ease of use, it’s better to emulate a machine using something like QEMU (which we will see later), but the satisfaction of your code running on real hardware is maybe worth it. Up to you.</em></p>
</blockquote>

<p>Anyway, how to construct such a disk image? I’m working on Linux, so I have a package installed called <code class="language-plaintext highlighter-rouge">dosfstools</code> which allows me to work with FAT filesystems without directly mounting them. I also have <code class="language-plaintext highlighter-rouge">fdisk</code> installed to format the disk image in the first place. For compilation and linking we <em>need</em> to use clang rather than gcc because it supports compilation and linking against non-native targets (remember, we need to produce a Windowsey PE executable).</p>

<h3 id="compiling">Compiling</h3>

<p>With that said, let’s start by compiling this thing. The entire C source is in a file called <a href="https://codeberg.org/j4cobgarby/os_blog_posts/src/branch/main/1_helloworld/boot.c">boot.c</a></p>

<div class="language-sh highlighter-rouge"><div class="highlight"><pre class="highlight"><code>clang <span class="nt">-c</span> <span class="se">\</span>
    <span class="nt">-target</span> x86_64-unknown-windows <span class="se">\</span>
    <span class="nt">-ffreestanding</span> <span class="se">\</span>
    <span class="nt">-fno-stack-protector</span> <span class="se">\</span>
    <span class="nt">-mno-red-zone</span> <span class="se">\</span>
    <span class="nt">-Wall</span> <span class="nt">-Wextra</span> <span class="nt">-Wpedantic</span> <span class="nt">-g</span> <span class="se">\</span>
    <span class="nt">-o</span> boot.o boot.c
</code></pre></div></div>

<p>Although we need to pass a few odd flags to the compiler and linker, it’s really quite standard compilation at its core. We need to specify that the compilation target is “windows” so that clang generates an object file format suitable for linking as a PE executable.</p>

<p>The <code class="language-plaintext highlighter-rouge">freestanding</code> flag tells the compiler that we don’t have a standard library (so no printf and friends). <code class="language-plaintext highlighter-rouge">no-stack-protector</code> tells the compiler not to generate code to automatically check for things like buffer overflows (a check which would be very useful for userspace code, but that can get in our way when we’re doing low-level memory stuff).</p>

<p>A “red zone” is a 128-byte region of memory just beyond the stack pointer which functions can use without worrying about their data being clobbered by interrupts, when running on top of an operating system. Since we do not have any operating system ensuring that the “red zone” is safe to use, we just disable it altogether with <code class="language-plaintext highlighter-rouge">-mno-red-zone</code> – it’s only an optimisation anyway, and one that we don’t need.</p>

<p>Once we have our <code class="language-plaintext highlighter-rouge">boot.o</code> object file, we need to create the PE executable:</p>

<div class="language-sh highlighter-rouge"><div class="highlight"><pre class="highlight"><code>lld-link /subsystem:efi_application <span class="se">\</span>
    /entry:efi_main <span class="se">\</span>
    /nodefaultlib <span class="se">\</span>
    /out:boot.efi
</code></pre></div></div>

<p>You’ll notice that we now use these “Windows-style” flags, starting with slashes. That’s because we’re invoking <code class="language-plaintext highlighter-rouge">lld-link</code>, which is the Windows backend for the LLVM linker. The <code class="language-plaintext highlighter-rouge">/subsystem</code> flag specifies what environment the executable is supposed to run under, so that the linker understands how to link it up. One major thing this actually affects is a field in the executable header stating that it’s an EFI application; if we don’t do this, UEFI will just refuse to load it. <code class="language-plaintext highlighter-rouge">entry</code> and <code class="language-plaintext highlighter-rouge">nodefaultlib</code> are self-explanatory enough, I reckon.</p>

<p>Now all that’s left to do is to actually construct the disk image and place the EFI application’s executable in the right place inside!</p>

<h3 id="creating-the-disk">Creating the Disk</h3>

<div class="language-sh highlighter-rouge"><div class="highlight"><pre class="highlight"><code><span class="c"># Make a 65MiB disk</span>
<span class="nb">dd </span><span class="k">if</span><span class="o">=</span>/dev/zero <span class="nv">of</span><span class="o">=</span>disk.img <span class="nv">bs</span><span class="o">=</span>1M <span class="nv">count</span><span class="o">=</span>65

<span class="c"># Format the disk. My disk_layout.txt can be found in the attached repo, at</span>
<span class="c"># https://codeberg.org/j4cobgarby/os_blog_posts/src/branch/main/1_helloworld/disk_layout.txt</span>
sfdisk disk.img &lt; disk_layout.txt

<span class="c"># Format the first (and only) partition as FAT32</span>
mkfs.fat <span class="nt">-F</span> 32 <span class="nt">--offset</span> 2048 disk.img 65536

<span class="c"># Make directories and place in the application!</span>
mmd <span class="nt">-i</span> disk.img@@1M ::/EFI
mmd <span class="nt">-i</span> disk.img@@1M ::/EFI/BOOT
mcopy <span class="nt">-i</span> disk.img@@1M boot.efi ::/EFI/BOOT/BOOTX64.EFI
</code></pre></div></div>

<p>One pretty cool thing to note in the above is that we can make the DOS tools like <em>mmd</em> and <em>mcopy</em> directly work on a FAT filesystem on a partition of a disk image by just specifying the offset into the image where it begins. That’s what the double-‘@’ syntax means.</p>

<h3 id="emulating-with-qemu">Emulating with QEMU</h3>

<p>Though you could just whack your newly created disk image onto a USB stick and boot from it on a real computer, it’s easier for rapid development (plus safer) to emulate it. For this, I really like QEMU. Not only does it emulate a machine with configurable hardware attached, it even provides a GDB stub so I can debug low-level kernel code (though I’m having trouble getting GDB to work with the UEFI PE executable; if anyone knows how to do that from Linux, please send me an email!)</p>

<p>The only problem is that QEMU doesn’t ship with a UEFI firmware implementation, so we have to give it one. There’s a really cool project called <a href="https://github.com/tianocore/tianocore.github.io/wiki/OVMF">OVMF</a> which produces a UEFI firmware implementation for QEMU, but I find the links on their Github to mostly not work when it comes to actually downloading a pre-built copy of the firmware.</p>

<p>I <em>could</em> build the firmware all myself, but then I need a few dependencies, and so I find it much easier to download the OVMF package distributed by Debian! However you do it, you need to end up with an OVMF.fd (or similar) file to install in QEMU’s emulated flash memory. Do take a look at <a href="https://codeberg.org/j4cobgarby/os_blog_posts/src/commit/ba9da79e42d3415357ad9264779788f4f9218f54/1_helloworld/Makefile">the Makefile in this post’s code repo</a> to see how I extract it from the Debian distribution.</p>

<p>And finally, the moment we’ve all been waiting for: let’s run our very own UEFI application!</p>

<div class="language-sh highlighter-rouge"><div class="highlight"><pre class="highlight"><code>qemu-system-x86_64 <span class="se">\</span>
    <span class="nt">-drive</span> <span class="k">if</span><span class="o">=</span>pflash,format<span class="o">=</span>raw,readonly<span class="o">=</span>on,file<span class="o">=</span>OVMF.fd <span class="se">\</span>
    <span class="nt">-drive</span> <span class="nv">format</span><span class="o">=</span>raw,file<span class="o">=</span>disk.img <span class="se">\</span>
    <span class="nt">-m</span> 1G
</code></pre></div></div>

<p>And of course, <a href="/assets/img/uefi_1.png">here’s a screenshot</a> of our Hello World application in its modest glory.</p>

<p>That’s all for now; thanks for reading! Feel free to browse <a href="https://codeberg.org/j4cobgarby/os_blog_posts">the code</a>, and make sure to stay tuned for the next installment, in which we will see how to parse and load an ELF executable from the disk!</p>]]></content><author><name>Jacob Garby</name></author><category term="blog" /><summary type="html"><![CDATA[I’ve been fiddling about with UEFI recently, and trying to work out how I can write a UEFI application which could form the bootloader of an operating system. It seems like a pretty nice interface, so I’ll write a bit about it here.]]></summary></entry><entry><title type="html">Presenting My Paper at Euro-Par 2025</title><link href="/blog/2025/09/03/Euro-Par-2025.html" rel="alternate" type="text/html" title="Presenting My Paper at Euro-Par 2025" /><published>2025-09-03T00:00:00+00:00</published><updated>2025-09-03T00:00:00+00:00</updated><id>/blog/2025/09/03/Euro-Par-2025</id><content type="html" xml:base="/blog/2025/09/03/Euro-Par-2025.html"><![CDATA[<p>Last week I was in Dresden for <a href="https://2025.euro-par.org/">Euro-Par 2025</a>! I went to present <a href="https://link.springer.com/chapter/10.1007/978-3-031-99857-7_17">my paper</a> about speeding up neural network training with a new kind of parallel thread synchronisation scheme. It was the first time doing that since starting my PhD back in September 2023, so I wasn’t quite sure what to expect, but it was a really fun event. I even managed to sneakily record my own presentation (see below!)</p>

<center>
<iframe width="90%" height="400px" src="https://www.youtube.com/embed/RnzR7FxzWx8?si=j6N3mjfjr-Imf2ru&amp;start=19" title="YouTube video player" frameborder="0" allow="accelerometer; autoplay; clipboard-write; encrypted-media; gyroscope; picture-in-picture; web-share" referrerpolicy="strict-origin-when-cross-origin" allowfullscreen=""></iframe>
</center>

<h2 id="the-paper">The Paper</h2>

<p><a href="/assets/pdf/int_async.pdf"><svg class="bi bi-filetype-pdf" fill="currentColor" height="64" viewBox="0 0 16 16" width="64" xmlns="http://www.w3.org/2000/svg"><path d="M14 4.5V14a2 2 0 0 1-2 2h-1v-1h1a1 1 0 0 0 1-1V4.5h-2A1.5 1.5 0 0 1 9.5 3V1H4a1 1 0 0 0-1 1v9H2V2a2 2 0 0 1 2-2h5.5L14 4.5ZM1.6 11.85H0v3.999h.791v-1.342h.803c.287 0 .531-.057.732-.173.203-.117.358-.275.463-.474a1.42 1.42 0 0 0 .161-.677c0-.25-.053-.476-.158-.677a1.176 1.176 0 0 0-.46-.477c-.2-.12-.443-.179-.732-.179Zm.545 1.333a.795.795 0 0 1-.085.38.574.574 0 0 1-.238.241.794.794 0 0 1-.375.082H.788V12.48h.66c.218 0 .389.06.512.181.123.122.185.296.185.522Zm1.217-1.333v3.999h1.46c.401 0 .734-.08.998-.237a1.45 1.45 0 0 0 .595-.689c.13-.3.196-.662.196-1.084 0-.42-.065-.778-.196-1.075a1.426 1.426 0 0 0-.589-.68c-.264-.156-.599-.234-1.005-.234H3.362Zm.791.645h.563c.248 0 .45.05.609.152a.89.89 0 0 1 .354.454c.079.201.118.452.118.753a2.3 2.3 0 0 1-.068.592 1.14 1.14 0 0 1-.196.422.8.8 0 0 1-.334.252 1.298 1.298 0 0 1-.483.082h-.563v-2.707Zm3.743 1.763v1.591h-.79V11.85h2.548v.653H7.896v1.117h1.606v.638H7.896Z" fill-rule="evenodd"></path></svg></a></p>

<p>The paper I presented at Euro-Par was titled “Interval-Asynchrony: Delimited Intervals of Localised Asynchrony for Fast Parallel SGD”. It’s the first paper I managed to write and get published during my PhD (so far!)</p>

<p>Watch the 20 minute presentation – or even better, read the paper – for more details, but here’s an overview (simplified, but should still get the point across). Basically, the problem is that we wanted to use the stochastic gradient descent algorithm (SGD) to train a neural network, which in our case is being used for image classification. If you want to speed up this algorithm, you can run it <em>in parallel</em>, which just means that you split up the work between a number of workers, which in our case are CPU threads.</p>

<p>The SGD algorithm consists of a number of iterations, and each iteration depends on the result of the previous one. At least, it does if you want it to be completely accurate. Then, the natural way to <em>parallelise</em> this process is to split the work of each iteration across all your threads, wait for them all to finish their piece, and then combine those results together somehow. Don’t worry about the details, other than what I’ve already explained.</p>

<p>So, this works, but some threads are inevitably at least a <em>tiny</em> bit faster than some others, and so they must spend some time doing nothing while waiting for slower ones to finish. This discrepancy adds up when you use hundreds of threads, and significantly limits the speed at which you can train your neural network.</p>

<p>The other side of the spectrum is <em>asynchronous</em> execution, where you basically just let all the threads run iterations independently, with no synchronisation. They all see the same neural network parameters in memory, and can just update them whenever they want. It’s really fast in terms of iterations per second, but significantly less <em>accurate</em> than synchronous execution, so maybe more iterations are needed to train the model.</p>

<p>We (and by we I mean my PhD supervisor Philippas Tsigas and I) thought that this trade-off was interesting, and designed a new type of execution scheme which has a parameter to determine “how asynchronous” you want it to be. This is really useful, because actually it turns out that as you get closer to convergence, you want more accurate updates, and so you can just change this parameter over time!</p>

<p>In terms of <em>how</em> exactly the amount of asynchrony is enforced: the idea is that we divide the whole execution into a series of “asynchronous intervals”. Threads run normal asynchronous execution during an interval, but any iterations that overlap two intervals are just ignored, i.e. not used to update the model. An interval ends when a certain number – that parameter that I mentioned a minute ago – of iterations have been completed during it. The point is that we can bound the inaccuracy by keeping this interval small, or we can widen it and speed up the throughput by rejecting fewer steps. Again, please look at the paper for proper details.</p>

<p>Anyway, it turns out that this is a pretty nice way of adjusting the amount of asynchrony, which is useful when paired with a clever way of setting that interval size parameter (which we also did in the paper!)</p>

<h2 id="the-conference">The Conference</h2>

<p>As I mentioned, it was my first proper conference, so I didn’t really know what to expect. I was quite looking forward to presenting my paper, and so I spent a couple of the evenings after the conference practicing it a bit. Weirdly – and this seems to happen in general – the more I rehearsed it, the more I forget what to say while rehearsing, but it always seems to be the case that once I actually go to present it for real it goes fine, more or less.</p>

<p>The conference itself was really well organised, and I met some really nice people there. In fact, I didn’t expect I would manage <em>that</em> much networking and socialising – it’s not something I do very much – but even on the first day (which was workshops rather than the main conference) I met a couple of nice people who were also going to be presenting their work. I think the fact that Euro-Par’s scope is quite broad (parallel programming of all kinds, really) made it a lot more interesting: if every presentation was in the same niche as mine, then it might get a little boring? But the theme at least meant I had some kind of understanding of the other works, at some level.</p>

<p>Hopefully I’ll get another paper accepted there in the next few years so I can go back :)</p>]]></content><author><name>Jacob Garby</name></author><category term="blog" /><summary type="html"><![CDATA[Last week I was in Dresden for Euro-Par 2025! I went to present my paper about speeding up neural network training with a new kind of parallel thread synchronisation scheme. It was the first time doing that since starting my PhD back in September 2023, so I wasn’t quite sure what to expect, but it was a really fun event. I even managed to sneakily record my own presentation (see below!)]]></summary></entry><entry><title type="html">Finally Spring</title><link href="/blog/2025/03/09/Spring-1.html" rel="alternate" type="text/html" title="Finally Spring" /><published>2025-03-09T00:00:00+00:00</published><updated>2025-03-09T00:00:00+00:00</updated><id>/blog/2025/03/09/Spring-1</id><content type="html" xml:base="/blog/2025/03/09/Spring-1.html"><![CDATA[<p>It was a long winter and I’ve been looking forward to spring coming for a long time now, for the better weather and more interesting things to take photos of. Today and yesterday the weather was great (particularly today), so I went to Trädgårdsföreningen once again to find some birds. At some point, surely, I will have to find a new place, but there always seems to be interesting stuff happening here.</p>

<p>First, here’s a goldeneye I saw yesterday. I went out with a tripod this time, and it was amazing the difference it makes when using my super long lens. It’s so much easier to keep it still.</p>

<p><img src="https://nc.jgarby.uk/s/PLbkMD7jkrKmsnf/preview" alt="" /></p>

<p>These next three are from today. I came across three different birds: a fieldfare, a goose, and a great tit. Actually, I hadn’t heard of a fieldfare before, so I had to ask a friend to ID it for me. It’s a type of thrush, and in Swedish is called a björktrast (birch thrush), which is fitting.</p>

<p><img src="https://nc.jgarby.uk/s/cnakGLC2fxroaFm/preview" alt="" /></p>

<p>Usually geese look pretty mean, or at least fed up, but this one looked a bit kinder. Maybe cause of the crocuses in the foreground. I’m sure it would still hiss at me if I got closer.</p>

<p><img src="https://nc.jgarby.uk/s/ybLFZRq9FwoofbH/preview" alt="" /></p>

<p>Got a bit lucky with the focus in this shot – it was a bit tricky with all the tiny branches in the way, and he really didn’t sit there for long. This was next to a bird feeder, so there were several tits congregating.</p>

<p><img src="https://nc.jgarby.uk/s/29969Qy5LfDQtXs/preview" alt="" /></p>]]></content><author><name>Jacob Garby</name></author><category term="blog" /><summary type="html"><![CDATA[It was a long winter and I’ve been looking forward to spring coming for a long time now, for the better weather and more interesting things to take photos of. Today and yesterday the weather was great (particularly today), so I went to Trädgårdsföreningen once again to find some birds. At some point, surely, I will have to find a new place, but there always seems to be interesting stuff happening here.]]></summary></entry><entry><title type="html">Winter Photos and Technical Site Update</title><link href="/blog/2025/02/11/Winter-Photos.html" rel="alternate" type="text/html" title="Winter Photos and Technical Site Update" /><published>2025-02-11T00:00:00+00:00</published><updated>2025-02-11T00:00:00+00:00</updated><id>/blog/2025/02/11/Winter-Photos</id><content type="html" xml:base="/blog/2025/02/11/Winter-Photos.html"><![CDATA[<h3 id="photos">Photos</h3>

<p>For most of winter I haven’t been going out and taking any photos. It’s been too dark, and (almost) all the birds have migrated south.</p>

<p>Last weekend, however, I took a very short – five minute – train up to Jonsered, and got a few nice images.</p>

<p><img src="https://nc.jgarby.uk/s/X6itGC4aA2KrDjF/preview" alt="" /></p>

<p>Here we can see the train to Alingsås approaching. I thought this was a pretty cool picture with that blurry chap in the foreground. In fact, the reason he’s quite <em>so</em> out of focus is that I was using a super long lens here, my 150-600mm Tamron, at close to full zoom. It’s a really fun lens to use, but really really heavy, and slightly hard to hold still. The active stabilisation helps.</p>

<p>The last photo for today is the following magpie.</p>

<p><img src="https://nc.jgarby.uk/s/CNXfzMPxsegpFew/preview" alt="" /></p>

<p>This demonstrates a bit better what this lens is capable of. It’s not completely sharp, especially around the magpie’s dishevelled facial fluff. I think this is likely to be my fault though, I still haven’t quite got the hang of what kind of shutter speed I need to take sharp hand-held photos with this.</p>

<p>Funnily enough, although I did get to Jonsered for my walk, I didn’t get any good photos there at all. The magpie was just sitting on a street-tree, so to speak.</p>

<h3 id="site-update">Site Update</h3>

<p>I thought that it wasn’t ideal to provide full-res versions of the images on these blog posts, just because they’re tens of megabytes and will add a lot to page load times. I fiddled around a bit with Jekyll (and a little Python script) so that I store a thumbnail version and a full version. Now, if you try clicking on one of these images you’ll get to download the full version!</p>

<p>I had to get a bit familiar with how Jekyll uses Liquid to do this, but it came down to this:</p>

<div class="language-ruby highlighter-rouge"><div class="highlight"><pre class="highlight"><code><span class="k">module</span> <span class="nn">Jekyll</span>
  <span class="k">class</span> <span class="nc">Thumbnailer</span> <span class="o">&lt;</span> <span class="no">Liquid</span><span class="o">::</span><span class="no">Tag</span>
    <span class="k">def</span> <span class="nf">initialize</span><span class="p">(</span><span class="n">tag_name</span><span class="p">,</span> <span class="n">text</span><span class="p">,</span> <span class="n">tokens</span><span class="p">)</span>
      <span class="k">super</span>
      <span class="vi">@img_name</span> <span class="o">=</span> <span class="n">text</span><span class="p">.</span><span class="nf">strip</span>
    <span class="k">end</span>

    <span class="k">def</span> <span class="nf">render</span><span class="p">(</span><span class="n">context</span><span class="p">)</span>
      <span class="n">thumb</span> <span class="o">=</span> <span class="vi">@img_name</span><span class="p">.</span><span class="nf">sub</span><span class="p">(</span><span class="sr">/\.(\w+)$/</span><span class="p">,</span> <span class="s1">'_thumbnail.\1'</span><span class="p">)</span>
      <span class="s2">"[![](</span><span class="si">#{</span><span class="n">thumb</span><span class="si">}</span><span class="s2">)](</span><span class="si">#{</span><span class="vi">@img_name</span><span class="si">}</span><span class="s2">)"</span>
    <span class="k">end</span>
  <span class="k">end</span>
<span class="k">end</span>
</code></pre></div></div>

<p>Basically, whenever I write something like <code class="language-plaintext highlighter-rouge">[![](my_image_thumbnail.jpg)](my_image.jpg)</code> it will substitute this for a bit of markdown consisting of an image (<code class="language-plaintext highlighter-rouge">my_image_thumbnail.jpg</code>) within a link to the original image. It works quite well and is a lot easier for me than if I had to type that out manually every time.</p>

<p>For actually creating these thumbnail images, I use Python with Pillow. If you’re curious or want to use it yourself, you’re welcome to look at it <a href="https://github.com/j4cobgarby/j4cobgarby.github.io/blob/main/minify_big_jpegs.sh">here</a>. Right now I just run this script manually when I upload new images, but in an ideal world my ruby code would be generating thumbnails when needed, on the fly. That’s a project for another day, I reckon.</p>]]></content><author><name>Jacob Garby</name></author><category term="blog" /><summary type="html"><![CDATA[Photos]]></summary></entry><entry><title type="html">A few photos with the Canon 80D</title><link href="/blog/2024/10/13/Photos1.html" rel="alternate" type="text/html" title="A few photos with the Canon 80D" /><published>2024-10-13T00:00:00+00:00</published><updated>2024-10-13T00:00:00+00:00</updated><id>/blog/2024/10/13/Photos1</id><content type="html" xml:base="/blog/2024/10/13/Photos1.html"><![CDATA[<p>(Skip to photos of <a href="#leaves">leaves</a>, <a href="#ducks">ducks</a>, or <a href="#trees">trees</a>?)</p>

<p>Recently I bought a new (used) camera, the Canon 80D. I used to use a Nikon D3300, but it disappeared while moving. Anyway, this new one is quite a bit nicer. The most noticeable differences for me are a far better live view mode (useful when I’m taking pictures at awkward angles) with a moveable touch screen (compared to the D3300’s static non-touch screen), more AF points when using the OVF, and a higher maximum frequency for taking photos.</p>

<h2 id="leaves">Leaves</h2>

<p><img src="https://nc.jgarby.uk/s/BWjfszcQfSdqnxb/preview" alt="" /></p>

<p>This was from the first time I went on an outing specifically to take pictures with this camera. I used the lens that came with it: the Canon EF-S 18-135mm f/3.5-5.6 IS USM. It’s in Trädgårdsföreningen, Göteborg. I think I got quite lucky with the weather on this day; some of the last warm sun we’ll have this year, I would guess.</p>

<h2 id="ducks">Ducks</h2>

<p>The following three images are also taken in Trädgårdsföreningen, but on the next weekend. Mainly I was playing around with fast shutter speeds to try and capture the birds doing interesting things. The main challenge was trying to get the pictures to be sharp, which was difficult since I had to increase the ISO to make up for the shutter speed.</p>

<p>All of these photos are taken with the same 135mmm zoom lens mentioned above.</p>

<p><img src="https://nc.jgarby.uk/s/Jp7y9ffDGwaN4Wn/preview" alt="" /></p>

<p>The duck above had just dived underwater and resurfaced. It’s quite cool seeing the water run off the hydrophobic feathers.</p>

<p><img src="https://nc.jgarby.uk/s/teq9XXBCND5tH5C/preview" alt="" /></p>

<p>This duck was relaxing on a protruding wooden stake sticking out of the river, although I cropped the photo quite close to see how much detail I could see. I could have got a much better quality image here if I used a shutter speed closer to, say, 1/800s. 1/2000 meant that I had to use a very high ISO, which wasn’t ideal. Not sure why I did that…</p>

<p><img src="https://nc.jgarby.uk/s/PYZFRdgopiCsjee/preview" alt="" /></p>

<p>I quite like this one, but there’s still a lot to improve on for next time. Opposite to the last photo, this one should have been shot with a significantly faster shutter to reduce the blur around his wings. I would have also liked to get a bit further down to the bird’s eye level. Partly this is just to get some more separation from the background.</p>

<h2 id="trees">Trees</h2>

<p>Here are a couple of photos from a nice forest just a few minutes from my apartment. I took these yesterday, to experiment with a second-hand lens I bought: a Canon EF 50mm f1.8 STM.</p>

<p>This is the first <em>prime</em> lens I’ve ever used – that is, it has a fixed focal length. Another thing to note is that it’s an <em>EF</em> lens, which means it’s for full-frame cameras. My Canon 80D is not full-frame, which means that I only “see” a section cropped out from the middle of what the lens sees. This is both a good and bad thing, depending. This 50mm lens becomes effectively 80mm for this reason, which can be good or bad.</p>

<p>Since lenses tend to be sharper nearer the center, in theory I should get sharper results with this than using it on a full-frame camera. On the other hand, if the lens was <em>just</em> sharp enough to produce a sharp image on a full-frame sensor, then the fact that I’m zoomed in could reveal softness.</p>

<p><img src="https://nc.jgarby.uk/s/d4r5RYYe2QCoZXE/preview" alt="" /></p>

<p>I was quite happy with this photo. Usually when I take photos of trees in scenes like this, the composition isn’t great and the picture looks boring. Here, the clearing between the foreground bushes and the background forest makes it a bit more interesting.</p>

<p><img src="https://nc.jgarby.uk/s/EkZkweKpKCQ7Jkf/preview" alt="" /></p>

<p>This is part of a hiking trail through the same woods as the previous photo. Everything looked very yellow here because it’s Autumn, and this particular type of long grass was everywhere in this boggy area of the route.</p>

<p>These wooden planks were for getting over those boggy areas, and in one part they have a long long path made of them which crosses a big reedy pond.</p>

<p>I’m not sure exactly what I think of this lens. In these two photos it was fine, but when I had the aperture very open (1.8-2.0) and had bright highlights, the lens was very prone to pink-coloured haze around these objects. This is something I can work around though, and I got the lens for a pretty good price, so I can’t complain :)</p>]]></content><author><name>Jacob Garby</name></author><category term="blog" /><summary type="html"><![CDATA[(Skip to photos of leaves, ducks, or trees?)]]></summary></entry><entry><title type="html">A Card Game</title><link href="/blog/2024/07/22/A-Card-Game.html" rel="alternate" type="text/html" title="A Card Game" /><published>2024-07-22T00:00:00+00:00</published><updated>2024-07-22T00:00:00+00:00</updated><id>/blog/2024/07/22/A-Card-Game</id><content type="html" xml:base="/blog/2024/07/22/A-Card-Game.html"><![CDATA[<p>This post explains the rules of a card game that I used to play at school with my friends. We called it Blackjack,
although it’s not at all like the <a href="https://en.wikipedia.org/wiki/Blackjack">game usually called Blackjack</a>.</p>

<p>I’m not sure where the game came from originally – probably it was based on some other game, but we added several
of our own rules to it over time. I think it’s a little like Uno, conceptually, although I’ve never played Uno.</p>

<h2 id="brief-overview">Brief Overview</h2>

<p>The aim of the game is to be the first to get rid of all of your cards.</p>

<p>In one turn you may play some cards according to the rules listed below. In a turn you can
play a potentially large number of cards, and can also do things that cause other
players to pick up new cards.</p>

<h2 id="setup">Setup</h2>

<p>Each player is dealt cards from a shuffled deck, until there are no cards left.</p>

<p>Like most card games, the players should sit in a circle-like formation around a table.</p>

<p>An arbitrary player goes first. It doesn’t matter at all, but it’s common to pick whoever is
to the left hand side of the dealer.</p>

<p>To begin with, turns proceed clockwise around the circle. Note that this direction can change 
later in the game.</p>

<h2 id="structure-of-a-turn">Structure of a Turn</h2>

<h3 id="picking-up-cards">Picking up cards</h3>

<p>At the start of your turn, first consider whether the last player’s turn caused you
to pick up some cards. This can be the case if they ended their turn by playing a
pick-up card (a 2 or a Jack). If you don’t, simply skip this step.</p>

<p>If you do have to pick up some cards, you can play an Ace to cancel this, thereafter playing
your turn as usual as if starting normally with this Ace.
Alternatively, you can play one or more other pick-up cards (following the normal rules of playing cards)
to prevent picking up anything yourself, but adding to the amount of cards to pick up for
the next player.</p>

<p>Failing either of these, you must pick up the correct number of cards. Your turn ends
immediately after doing so.</p>

<h3 id="playing-cards">Playing Cards</h3>

<p>This subsection describes the basic rules of playing cards. It ignores most special
cases caused by playing <a href="#power-cards">power cards</a>, which are described later.</p>

<ol>
  <li>Play a card which matches the suit <em>or</em> rank of the last card played. If you can’t,
you have to pick up a new card and end your turn now.</li>
  <li>You may end your turn here, or play more cards. If you want to play more cards,
you have to start by playing one or more cards of the same <em>rank</em> as the card
you played in step 1.</li>
  <li>If you decided to play more cards, you must now go back to step 1 in order to
play at least one more card. This is called “capping off”.
    <ul>
      <li>Capping off your turn is not required after playing Jacks or 2’s. This is to facilitate ending your
turn on pick-up cards, since they otherwise have no effect.</li>
      <li>Notice that this allows you to loop potentially many times, playing lots of cards. Importantly,
it also means that you cannot end a turn playing exactly two of some rank (without picking up a new card), but <em>can</em>
with three or more (because the third, etc., can count as the additional card played in step 1 after looping.)</li>
    </ul>
  </li>
</ol>

<h3 id="winning">Winning</h3>

<p>To win the game, you have to get rid of all your cards so that you have an empty hand.</p>

<p>You <strong>cannot</strong> win by playing a power card as your final card. In this case, you have to
pick up one new card.</p>

<h3 id="power-cards">Power Cards</h3>

<p>Some cards act differently when played. They’re known as Power Cards. They are:
Ace, 2, 3, 8, J, Q, K.</p>

<p>For each Power Card, the corresponding operation occurs at the moment that it’s
played (during a turn). Some Power Cards have additional rules about when they
may be played.</p>

<h4 id="ace-choose-new-suit">Ace (Choose new suit)</h4>

<ul>
  <li>Can be played on top of <em>any card</em> in step one of <a href="#playing-cards">the instructions</a>.
    <ul>
      <li>It <em>cannot</em> act as just any rank, when it comes to step two. This means that you couldn’t play <code class="language-plaintext highlighter-rouge">3h Ah Ac</code> as a turn.</li>
    </ul>
  </li>
  <li>When played, you can specify any suit. This card now acts as if it <em>is</em> that suit, for the purposes of cards being played on it in step one.</li>
  <li>As mentioned previously, if played first in a turn it can negate picking up cards from previous pick-up cards.</li>
</ul>

<h4 id="two-pick-up-2">Two (Pick up 2)</h4>

<ul>
  <li>Add two to the number of cards that the next player must pick up.</li>
  <li>As with all pick-up cards, it’s only effective if played as part of a consecutive run of pick-up cards at the end of a turn.</li>
</ul>

<h4 id="three-must-play-something-valid">Three (Must play something valid)</h4>

<ul>
  <li>You must immediately play any matching (suit <em>or</em> rank) card on top of it.
    <ul>
      <li>(Or pick up one)</li>
    </ul>
  </li>
  <li>You can think of this as resetting the turn back to step 1.</li>
</ul>

<h4 id="eight-skip-a-person">Eight (Skip a person)</h4>

<ul>
  <li>Skip the next person who would have had a turn, this round.</li>
  <li>Multiple eights can be played in one turn, in which case several people can be skipped.
    <ul>
      <li>You can skip so many people that it’s your turn next. This can lead to interesting scenarios.</li>
    </ul>
  </li>
</ul>

<h4 id="jack-pick-up">Jack (Pick up)</h4>

<ul>
  <li>Add something to the number of cards that the next player must pick up.
    <ul>
      <li>If it’s a red Jack, add 3.</li>
      <li>If it’s a black jack, add 5.</li>
    </ul>
  </li>
  <li>As with all pick-up cards, it’s only effective if played as part of a consecutive run of pick-up cards at the end of a turn.</li>
</ul>

<h4 id="queen-must-play-anything">Queen (Must play anything)</h4>

<ul>
  <li>You must play some card on top of it. You’re allowed to play anything.</li>
  <li>Similar to the <a href="#three-must-play-something">Three</a>, it effectively jumps to step 1. The difference
 between the Three is that you can play any card on top of the Queen.</li>
</ul>

<h4 id="king-reverse-direction">King (Reverse direction)</h4>

<ul>
  <li>Reverse the direction at which turns progress, flipping between clockwise and
 counter-clockwise.
    <ul>
      <li>This can interact with Eights in a strange way. Eights skip in the <em>current</em>
turn direction, which can change during the course of a turn.</li>
    </ul>
  </li>
</ul>

<h2 id="notes-for-playing">Notes for Playing</h2>

<h3 id="moving-cards-from-the-play-pile-to-the-deck">Moving Cards from the play pile to the deck</h3>

<p>At the start of the game, there is no deck from which to draw new cards, since
all of the cards are in the players’ hands. Of course, at some point, such a
deck will be necessary, so that players can pick up cards when they are
required to.</p>

<p>To facilitate this, it’s necessary to occasionally remove all but the top card
of the play pile and shuffle it into the deck.</p>

<p>Still, there could be a situation where a player must pick up more cards than
are in the deck <em>and</em> that are available to move into the deck from the
play pile. In this case, you can either:</p>

<ol>
  <li>Pick up as many cards as possible, exhausting the deck and play pile or</li>
  <li>Do as in option 1, but remember how many cards you still need “in debt”,
and pick them up as and when they become available.</li>
</ol>

<p>I can’t remember which option we used when we played. Probably 1, since 2
sounds like a hassle…</p>

<h3 id="example-turns">Example Turns</h3>

<p>If I’m playing first in a game (i.e. the play pile is empty), then here are some
simple turns which do not result in the player having to pick up any extra
cards themselves.</p>

<div class="language-plaintext highlighter-rouge"><div class="highlight"><pre class="highlight"><code>Example 1. 9h (9 of hearts)
Example 2. 9h 9c 4c
Example 3. 9h 9c 3c 4c
Example 4. Js Jc Jh
</code></pre></div></div>
<p>And here are some examples which, due to not “capping off” the turn, the player
must pick up one card from the deck after playing.</p>
<div class="language-plaintext highlighter-rouge"><div class="highlight"><pre class="highlight"><code>Example 5. ø (no cards played)
Example 6. 9h 9c
</code></pre></div></div>
<p>Here are some moves which utilise power cards, showing how different ones interact with
prior pick-up cards. In the following set of examples, the previous turn was <code class="language-plaintext highlighter-rouge">9c 9h Jh</code>,
hence three cards are to be picked up, and <code class="language-plaintext highlighter-rouge">Jh</code> is at the top of <code class="language-plaintext highlighter-rouge">discard</code>.</p>
<div class="language-plaintext highlighter-rouge"><div class="highlight"><pre class="highlight"><code>Example 7. ø &lt;pick up three cards from deck&gt;
Example 8. Ac
Example 9. Jc
</code></pre></div></div>

<p>Here’s an example of a particularly long turn.</p>

<div class="language-plaintext highlighter-rouge"><div class="highlight"><pre class="highlight"><code>Example 10. Ks Kc 6c 6h 6d 6s Qs 8h 8d 3d 4d 4h As Ac Ad Ah Jh Jd Jc Js
</code></pre></div></div>

<p>To clarify some points about example 10:</p>

<ul>
  <li>Two kings are played at first. This switches next-turn direction twice, so it’s unchanged.</li>
  <li>Two 8’s are played, thereby skipping the next two players. This takes effect after this turn.</li>
  <li>Four Jacks are played at the end, forcing the next player whose turn it is to pick up 3+3+5+5=16
 cards if they’re unable to cancel it with Aces (which they can’t, since all the Aces were played
 in this turn), and unable to add to the pick-up with at least a 2 of spades.</li>
</ul>]]></content><author><name>Jacob Garby</name></author><category term="blog" /><summary type="html"><![CDATA[This post explains the rules of a card game that I used to play at school with my friends. We called it Blackjack, although it’s not at all like the game usually called Blackjack.]]></summary></entry><entry><title type="html">Depth-First Search Maze Generation</title><link href="/blog/2023/11/21/DFS-Mazes.html" rel="alternate" type="text/html" title="Depth-First Search Maze Generation" /><published>2023-11-21T00:00:00+00:00</published><updated>2023-11-21T00:00:00+00:00</updated><id>/blog/2023/11/21/DFS-Mazes</id><content type="html" xml:base="/blog/2023/11/21/DFS-Mazes.html"><![CDATA[<p><a href="https://github.com/j4cobgarby/dfsmaze">Source on GitHub</a></p>

<p>There are quite a few approaches for generating mazes algorithmically. I particularly like
the graph based approaches, since they seem most adaptable. They are:</p>

<ul>
  <li>Using a MST algorithm (like Prim’s or Kruskal’s) on a randomly weighted graph.</li>
  <li>Performing a depth-first search on a graph, with some randomness built into the algorithm.</li>
</ul>

<p>Maybe there are even more graph-based maze generation methods, but I don’t know about them.
There are of course some non-graph-based methods, like iteratively splitting a space into
randomised chunks and cutting holes in the new walls<sup id="fnref:1"><a href="#fn:1" class="footnote" rel="footnote" role="doc-noteref">1</a></sup>, or even using cellular automata<sup id="fnref:2"><a href="#fn:2" class="footnote" rel="footnote" role="doc-noteref">2</a></sup>,
which are also interesting.</p>

<p>The reason I say that graph based approaches are most adaptable is because of their independence
on any particular shape or structure. You’ll see what I mean by this later on.</p>

<h2 id="defining-a-maze">Defining a Maze</h2>

<p>
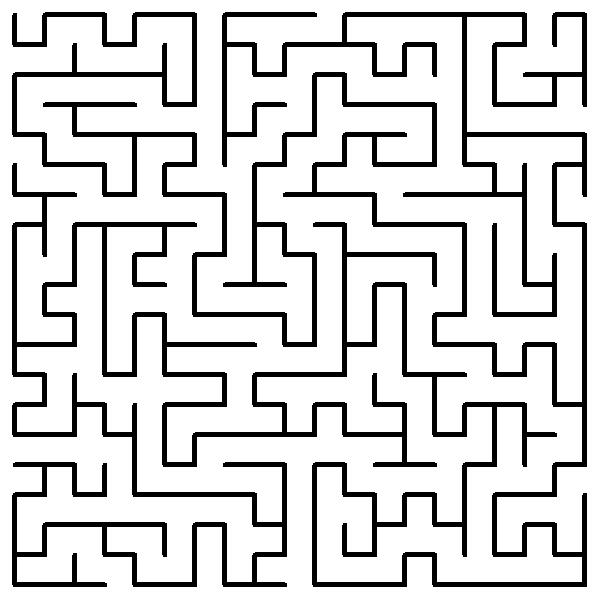
First it might be a good idea to define what a maze is and isn’t. For example, consider this:</p>

<p><img src="/assets/img/maze1.png" alt="A Simple Maze" /></p>

<p>
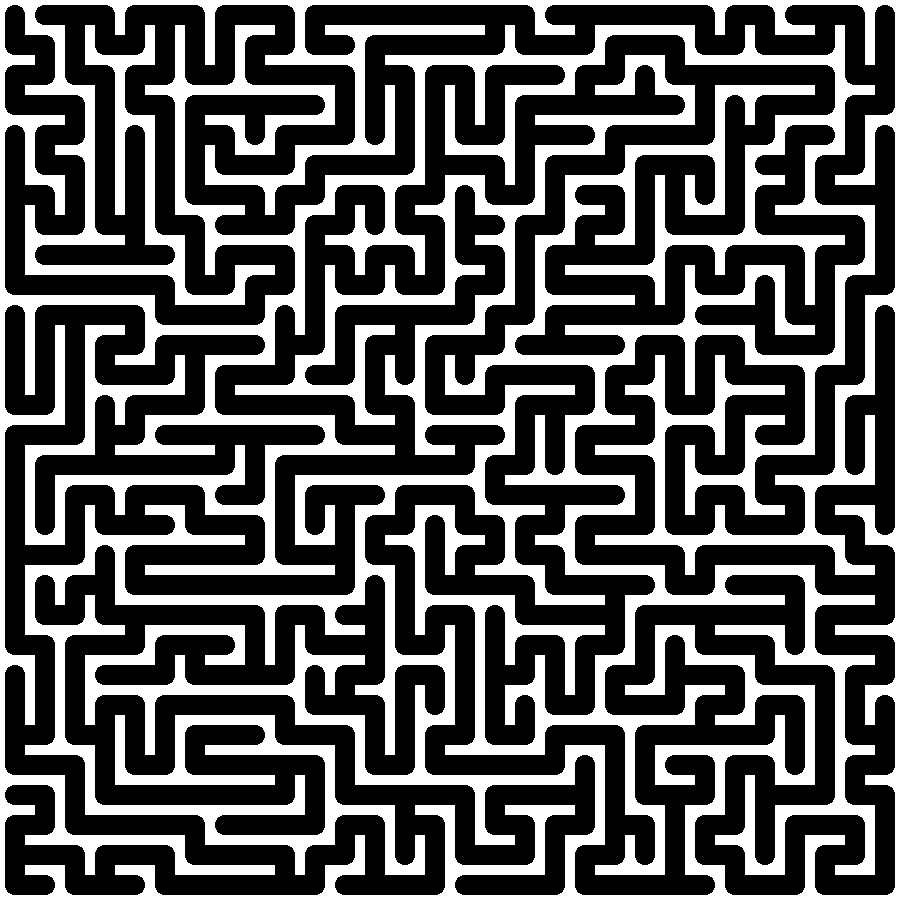
Imagine that the black lines are passageways that you can walk through. This definitely seems
like a maze. Here are some properties of this specific maze:</p>

<ul>
  <li>No loops/cycles: there is exactly one route from any one location to any other.</li>
  <li>There are no disconnected sections: any point is reachable from any other point.</li>
  <li>No obvious-at-a-glance route from a point to another far-ish-away point.</li>
</ul>

<p>The last of these is the most controversial of the three, since it’s very difficult to quantify
how <em>difficult</em> a maze is. However, here are some features of good mazes that probably help:</p>

<ul>
  <li>No repeating patterns, as these would make visually parsing the maze more manageable.</li>
  <li>No excessively long straight corridors/lots of bends makes following paths more tricky.</li>
  <li>Many points where passageways branch, meaning that someone solving the maze has to check a lot of different routes.</li>
</ul>

<p>Probably none of these features are <em>necessary</em> for something to be a maze, though. Loops are
definitely possible in mazes, there’s no reason why not, and the only reason they’re not present
in the above maze is because it is specifically a spanning tree of a graph. Mazes may in theory
have disconnected sections, I suppose, but in that case it would really just be two (or more)
mazes next to each other. Also, mazes don’t <em>need</em> to have a non-obvious solution – take the
kids mazes on the backs of some ceral boxes, for example.</p>

<p>In fact, mazes don’t even need to have branches. Some hedge mazes<sup id="fnref:3"><a href="#fn:3" class="footnote" rel="footnote" role="doc-noteref">3</a></sup>, for instance, are just one
long twisting path from start to finish. And should all mazes have a start and a finish? The maze
presented above doesn’t have a specific start or finish, but the nature of it means that any two
points on it can reasonably be chosen for these. I would say that a maze has to have a defined
start and finish, <em>or</em> be constructed such that they can be chosen arbitrarily.</p>

<p>I think a reasonable definition for a maze is just “A passageway (or collection of passageways)
connecting a start to a finish”. Then if our maze has starts and finishes that can be chosen
arbitrarily, we basically have a set of mazes with the same construction but with different
start and finish points. Anyway, this doesn’t matter.</p>

<h2 id="depth-first-search">Depth-First Search</h2>

<p>The maze-generation algorithm I’m going to talk about now is depth-first search (DFS). This algorithm
is used for many more useful purposes than generating mazes, but this is what I’ll use it for.</p>

<p>DFS takes a graph (a collection of nodes and edges between them) and a starting node, and, in a certain 
order, examines each of these. The reason it’s called “depth-first” is that it starts by traversing one
path for as long as possible before going back to try another one. This is in contrast to breadth-first
searching which, before examining any node which is n nodes away from the starting node, examines all
those which are up to n-1 away.</p>

<p>This post isn’t meant to be a detailed depth-first search tutorial – you can easily find those
anywhere on the internet. Even still, here’s some rough pseudocode for one iteration of the algorithm,
as I implemented it for this purpose:</p>

<div class="language-plaintext highlighter-rouge"><div class="highlight"><pre class="highlight"><code>PROCEDURE dfs_step
INPUTS:
  G: The graph to search
  S: A stack data structure.

WHILE S is not empty
  next = S.pop()

  IF `next` has not yet been visited:
    Visit `next`

    FOR EACH edge IN `next`'s neighbours:
      S.push(`edge`)

    RETURN
</code></pre></div></div>

<p>This is slightly different to standard iterative DFS implementations, in that the procedure only
executes one <em>step</em>, by which I mean it runs until it either exhausts the stack or a new node is
visited. Normal implementations run until the entire graph has been visited.</p>

<p>The reason for this difference is that I wanted to display a realtime animation of the algorithm
running, and this implementation allows me to periodically run a step (say, every half a second)
and update the graphical representation accordingly, without the algorithm itself needing to know
anything about this.</p>

<p>To summarise the pseudocode, we repeatedly pop nodes from the stack until we find one that we
haven’t visited yet. Then, we “visit” it, push all of its neighbours to the stack, and <em>return</em>,
i.e. end the procedure. A traditional DFS implementation won’t return at this point, as I mentioned
earlier, and instead will repeat until there’s nothing left on the stack.</p>

<p>The meaning of “visiting” a node depends on what the DFS is meant to achieve. For example, another
use of DFS is finding <a href="https://en.wikipedia.org/wiki/Component_(graph_theory)#Algorithms">connected components</a>
within a graph. To do this, we can just begin a DFS at an arbitrary node, and efficiently find
the connected component that contains it, then repeating the process on an unclassified node. In such a case, “visiting” a node would be adding it to a list of nodes in some structure
representing the connected components of a graph.</p>

<p>What about generating a maze, though? If we run DFS on any graph and make a note of the order in which
nodes are visited, we can construct a tree containing every node. Let’s run through a quick example.</p>

<p><img src="/assets/img/dfstree1.png" alt="The graph" />
<img src="/assets/img/dfstree2.png" alt="DFS intermediate" />
<img src="/assets/img/dfstree3.png" alt="DFS finished" /></p>

<p>
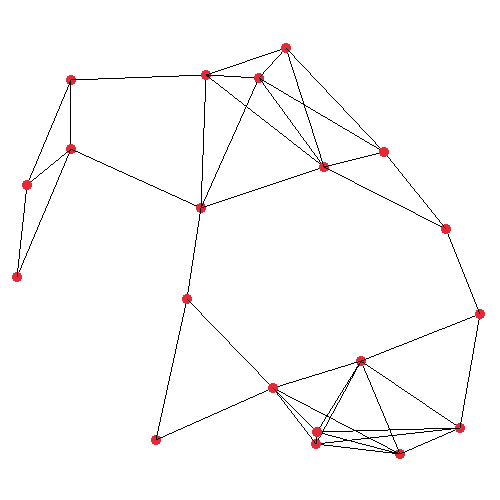
The first image shows the plain graph which we’ll operate on. I generated this graph by randomly
placing 20 nodes in a 500×500 unit space, and mutually connecting any two nodes which are closer
than (or exactly) 150 units apart. The second image visualises the very first iteration of my DFS
step procedure. It’s starting at the top-left node, where the orange and green lines are protruding
from, which represent all of the node under consideration’s neighbours. The actual implementation
pushes the edges such that the <em>closest</em> edge is at the <em>top</em> of the stack.</p>

<p>
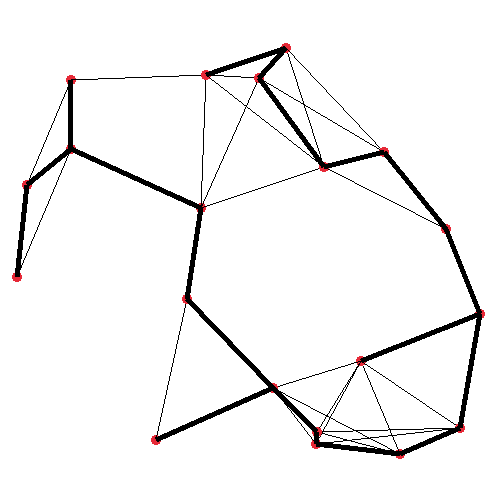
In the third image, in bold, the resulting spanning tree is shown. It may not look <em>much</em> like a
maze at this point, but the point is we can run this on any graph, and certain graphs will yield
better mazes. In fact, the big square maze presented earlier in this post was generated in the
exact same way as this tree. The primary difference between these two, and all the other mazes
I’ll make, are in the way the graph is generated initially, although I make a couple of extra
modifications to the algorithm as well, for some.</p>

<h2 id="grid-like-maze">Grid-like Maze</h2>

<p>A very standard type of maze is square-shaped, with horizontal and vertical passageways. I can
very easily write a function to place nodes in a square grid, and join them to their correct neighbours.
Then I can just feed this graph into the DFS algorithm, and…</p>

<p><img src="/assets/img/boringgrid.png" alt="Boring Grid Maze" /></p>

<p>Oh, it’s not a very good maze. Going back to my thoughts earlier about what makes a (good) maze,
we can see that this one has no cycles and no disconnected sections, like the earlier maze, <em>but</em>,
it’s very easy to solve this maze from any point A to any point B. In fact it’s trivial, because
this maze has no branches at all – it’s topologically equivalent to a straight line. Starting from
A, you can always get to B, regardless of where B is, by just trying each of the two opposite directions.
In fact this maze is <em>even</em> worse than just the general case of mazes topologically equivalent to
straight lines, because it has a consistent repeating zig-zag pattern going downwards, so if you
know the positions of A and B you can immediately know whether you have to travel up or down in space,
and hence work out if you need to start moving left or right. In other words, with this maze, it
would be possible to implement a function <code class="language-plaintext highlighter-rouge">Node next_node(Node current_node, Node to_find)</code> that
runs in O(1) time, given that we can view the structure of the maze from above.</p>

<p>The reason that our algorithm generates a zig-zag maze here is just because we don’t involve any
randomness yet. The procedural method by which we generated our graph appends neighbouring nodes
to a list contained within each node, and this list is iterated in order when pushing to the stack
in the DFS algorithm. The way that this list is generated means that neighbours are pushed in the
order (up, down, left, right), and so if a right-facing neighbour <em>is</em> present, this will always
be preferred (because it will be at the top of the stack at the start of the next iteration). This
explains the intial long-as-possible right-facing path. It only stops moving right when it can’t
anymore, because that neighbour is then not pushed to the stack.</p>

<p>The solution is simple though, we can just shuffle each node’s neighbour list at initialisation
time. And this pattern has the added benefit that it’s adaptable to different patterns that we
might want. For example, remember what I mentioned earlier about picking the neighbour closest
to the current node, when we saw the DFS algorithm running on a more freeform graph layout? Well
that behaviour doesn’t have to be impemented within DFS at all, keeping it more generalised.
Instead we implement that in the same way as this neighbour shuffling, by <em>sorting</em> each node’s
neighbours list by distance, specifically for graphs where we want this shortest-first behaviour.</p>

<p>
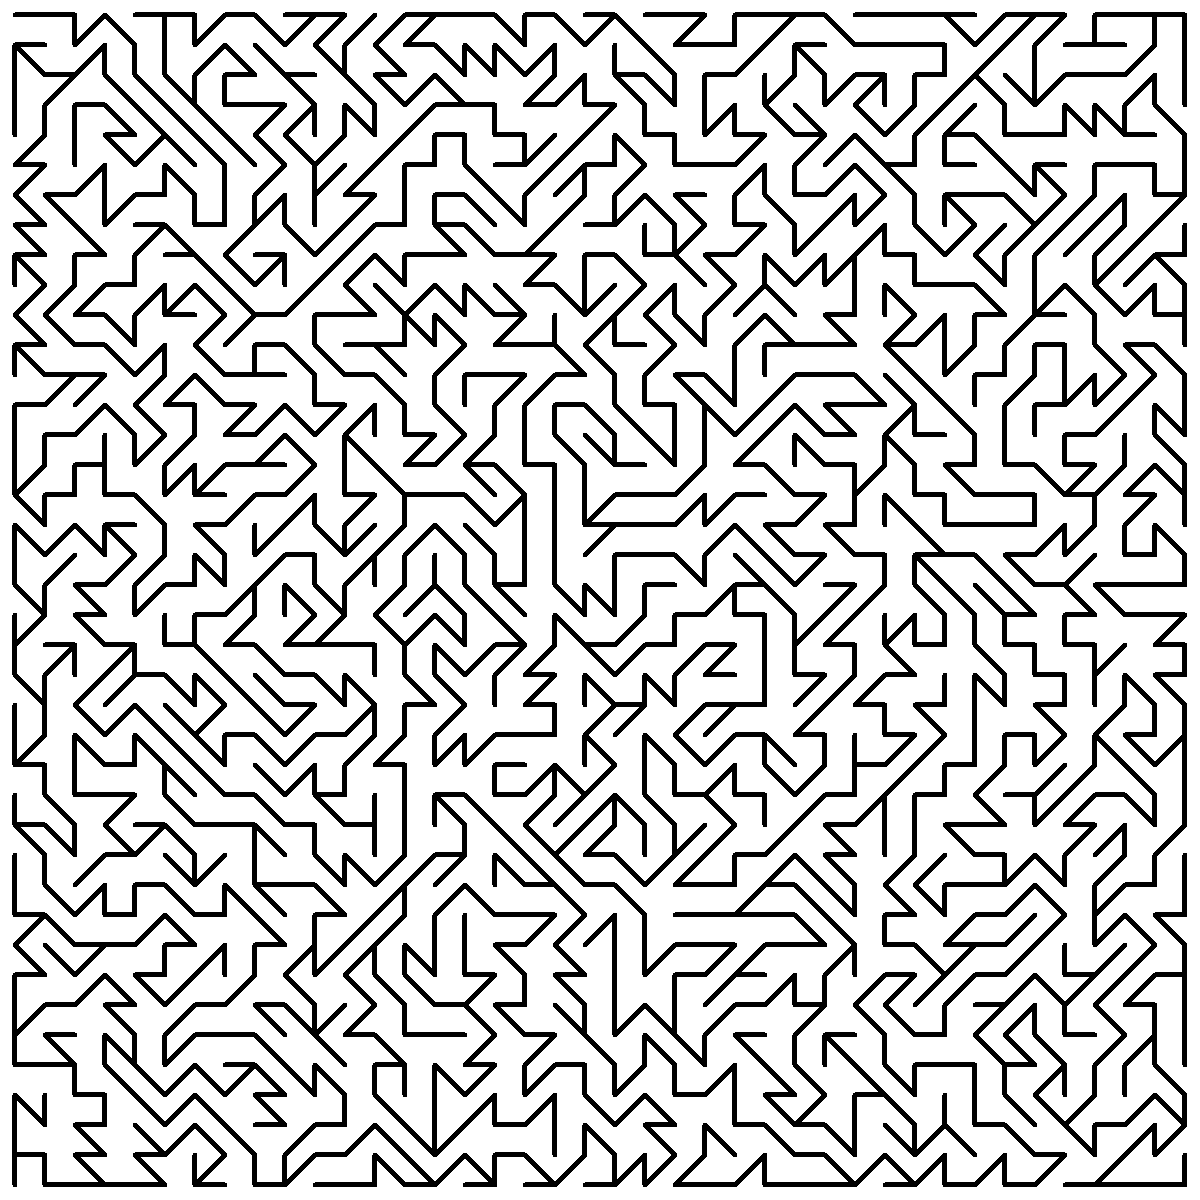
Anyway, if we implement this neighbour shuffling, we get this:</p>

<p><img src="/assets/img/goodgrid.png" alt="Better grid" /></p>

<p>This is significantly better. Now, we have <em>lots</em> of branching – this occurs when a search
path gets to a point where it cannot go any deeper, so it pushes no neighbours for the next
iteration and instead some neighbours that were pushed by an earlier iteration are taken
instead.</p>

<p>This maze still isn’t ideal though. The branches, although many, are not, on average, very
deep, which makes it easy to quickly disregard many of them when solving the maze. I think
this is just because this particular maze is fairly small. If I generate a larger one, the
branches become far longer.</p>

<p><img src="/assets/img/gridbig.png" alt="Larger grid" /></p>

<h2 id="customising-the-maze">Customising The Maze</h2>

<p>It can be fun to fiddle with the code a bit to get some different interesting mazes. With our
graph-based maze approach, there are a lot of options here, because we simply apply our algorithm
to any graph.</p>

<h3 id="grid-like-mazes">Grid-Like Mazes</h3>

<p>First, let’s look at different ways we can modify our existing grid maze.</p>

<p><img src="/assets/img/gridmod1.png" alt="Diagonal Neighbours" />
<img src="/assets/img/gridmod2.png" alt="Slant 1" />
<img src="/assets/img/gridmod3.png" alt="Slant 2" /></p>

<p>The only change needed to generate these three mazes is to change which nodes count as neighbours of other nodes. Before, a node only neighboured adjacent nodes cardinally north, east, south, and west of it, but this can easily be changed when generating the graph.</p>

<p>For the first of these three examples, the neighbourhood includes all eight adjacent nodes, including diagonals. This produces maybe a more “organic” looking design. It also kind of reminds me of runes in some fantasy game?</p>

<p>In the second example, the four cardinal directions are included, as well as north-west and south-east neighbours. This creates angles paths, and almost looks like a normal maze has just been skewed.</p>

<p>The third example is similar, except depending on the node’s position on the y-axis the “skew” direction is either left or right.</p>

<h3 id="loose-graph-layout">
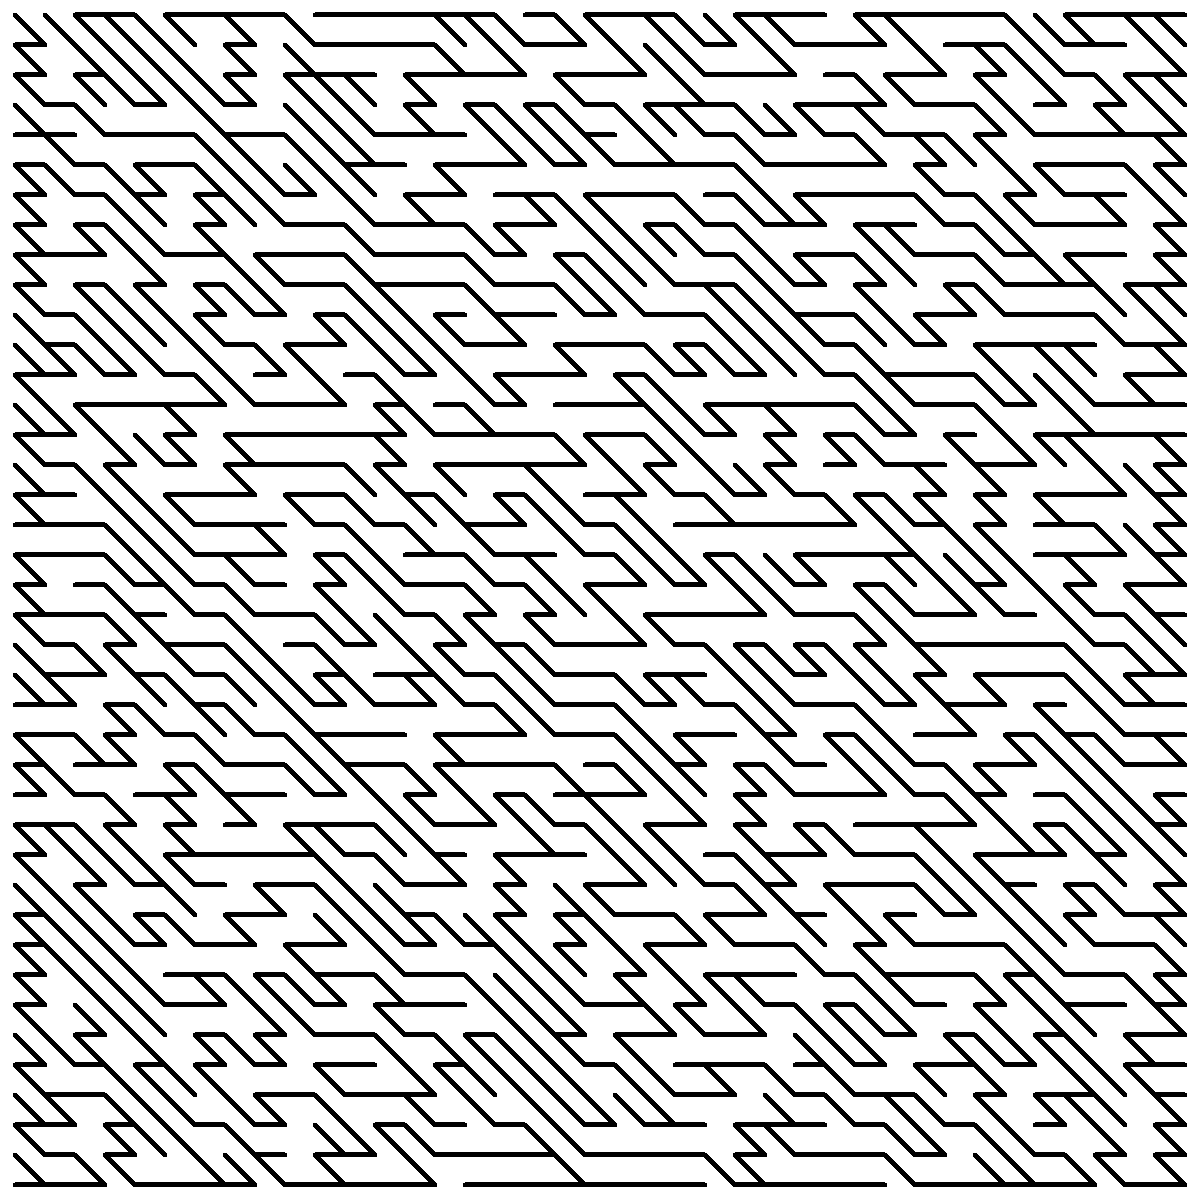
“Loose” Graph Layout</h3>

<p>
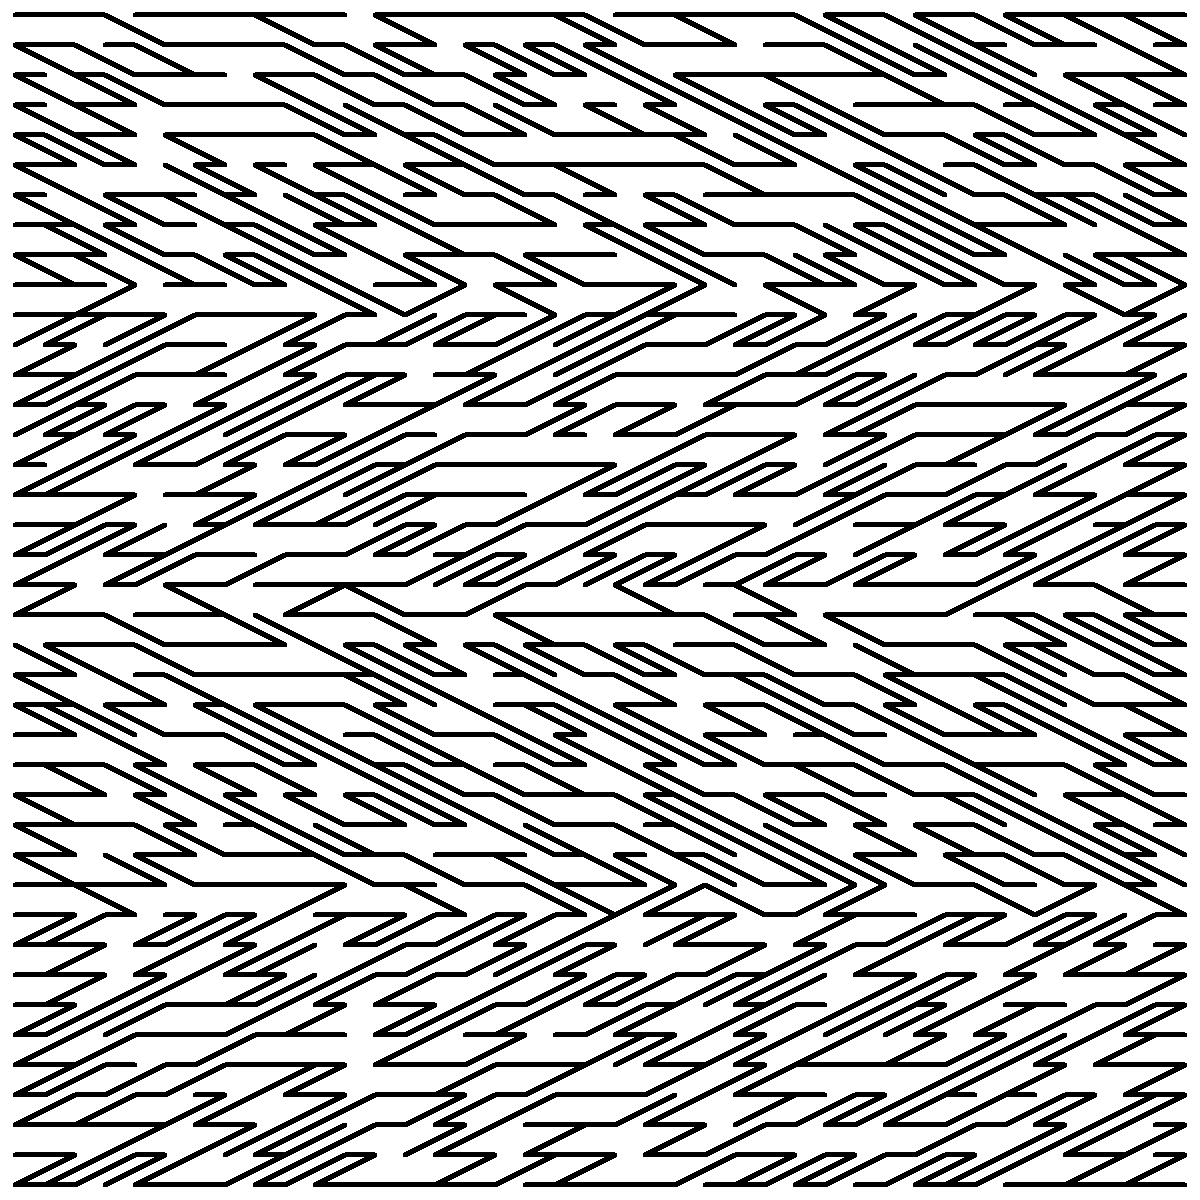
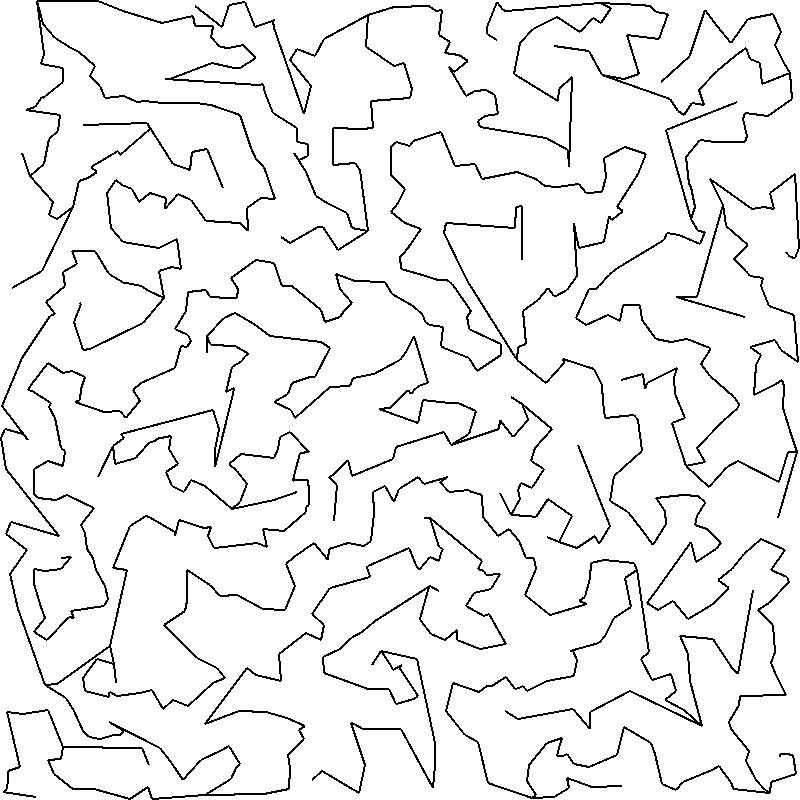
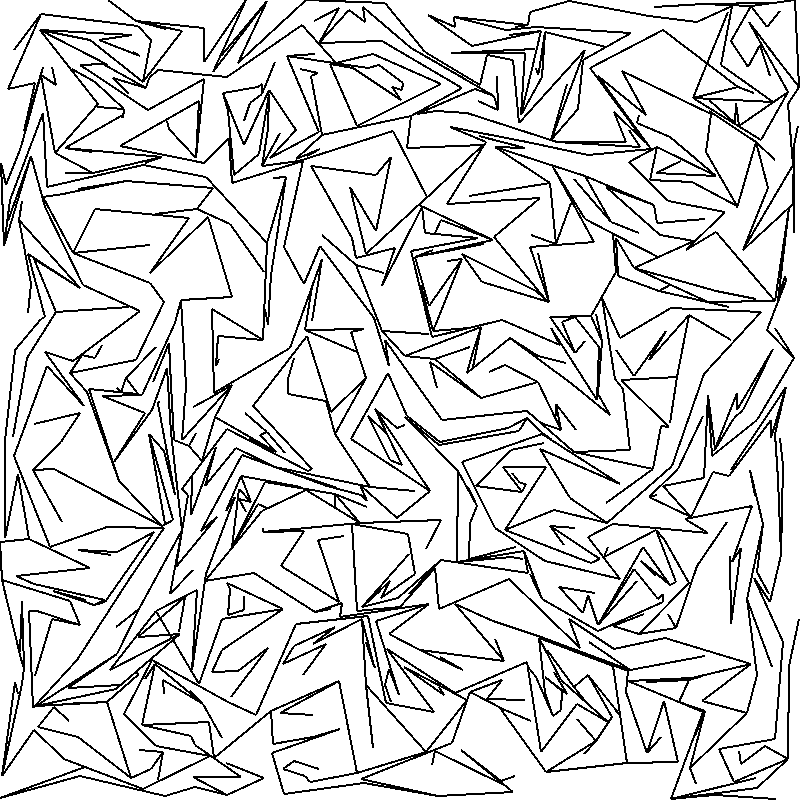
As shown earlier, we can generate a maze on top of any graph, not only rigid grids. For these next tests, I place 1000 nodes randomly in a 800x800px world.</p>

<p><img src="/assets/img/loosemaze_1.png" alt="Distance Ordered" />
<img src="/assets/img/loosemaze_2.png" alt="Random Ordered" /></p>

<p>To determine the neighbours, the first of these two examples finds all other nodes which are within a certain threshold distance (in this case 100px), and uses this set as its neighbourhood. The ordering of these neighbours (which determines how DFS will traverse the graph – remember how we randomised the ordering of neighbours for the rigid grid earlier) is simply their distance. The shortest node comes first in the neighbour order.</p>

<p>This means that we get lots of winding, intricate paths, since it’s biased towards picking out small details.</p>

<p>In the second example, the set of neighbours is generated identically (though with a different random seed). The only difference is that instead of ordering the neighbours by their distance, they’re just shuffled (exactly like the earlier rigid grid examples). Since here we have a combination of a fairly high threshold and densely packed nodes, we get a bit of a mess here. I think it looks like the creases of scrunched up tin foil.</p>

<p>If you <a href="https://github.com/j4cobgarby/dfsmaze">experiment with this yourself</a>, it’s fun to play with the density and threshold parameters for the loose graph. If the nodes are too sparse, though, there is a chance that you’ll encounter disconnected regions, meaning that the whole graph will not be part of the maze.</p>

<p>Some nice things to do to extend this would be:</p>

<ul>
  <li>Some constraint for a minimum distance between two nodes. At the moment, two nodes may spawn almost touching, which can make the resultant maze look like it contains cycles even when it doesn’t.</li>
  <li>A neighbourhood ordering function which takes into account distance but applies some randomness on top of this.</li>
</ul>

<p><em>Aside on overlapping passages:</em> When I first ran a version of this “loose maze” generator, sometimes passages would overlap. This was of course because the neighbourhood generation didn’t take this into account, and the DFS algorithm itself didn’t check for overlaps either.</p>

<p>I had the option of either ensuring no overlaps when generating the ‘substrate’ graph, or making a DFS which is aware of this. I decided on the latter, since whether an edge may exist without overlapping only depends on previous edges that have been <em>visited</em>.</p>

<h2 id="other-fun-shapes">Other Fun Shapes</h2>

<p>
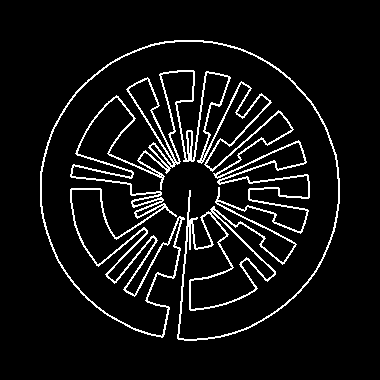
The current state of the program supports grid mazes and loose mazes, and some code to try and generate a labyrinth-like maze (where nodes lie on concentric circles, with a few edges between them). The labyrinth generator isn’t working that well at the moment – ideally, I want fully the concentric circles to have long unbroken sections, with far fewer inter-ring connectors.</p>

<p>Below, <em>my</em> radial graph is on the left, and on the right is something that I would like mine to look like! One major difference here is that the target image uses lines as walls, whereas mine uses lines as passages. I think that DFS might not be the correct algorithm to use to generate this sort of maze, anyway.</p>

<p><img src="/assets/img/radialmaze.png" alt="My radial graph" />
<img src="https://www.kairos2.com/Labyrinth.png" alt="Something that I would like it to look like" /></p>

<p>If you’re interested in this, you should definitely have a go at writing your own code to generate graphs. Here are some ideas:</p>

<ul>
  <li>Fix my labyrinth implementation.</li>
  <li>Make a maze which resembles an image, or some text.</li>
  <li>Generate a voronoi diagram, and use its interface lines as edges.</li>
</ul>

<p><strong>You can find the source code <a href="https://github.com/j4cobgarby/dfsmaze">on GitHub!</a></strong></p>

<h2 id="final-thoughts">Final Thoughts</h2>

<p>Depth-first search on a graph can generate some quite nice custom mazes. Since it’s “<em>depth</em>-first”, though, there is some bias towards long paths, which may or may not be desirable. Other algorithms (such as a greedy MST algorithm or a breadth-first search) will have different characteristics in this way, which might be better for some applications.</p>

<hr />

<h3 id="references">References</h3>

<div class="footnotes" role="doc-endnotes">
  <ol>
    <li id="fn:1">
      <p><a href="https://weblog.jamisbuck.org/2011/1/12/maze-generation-recursive-division-algorithm">Buckblog: Maze Generation</a> <a href="#fnref:1" class="reversefootnote" role="doc-backlink">&#8617;</a></p>
    </li>
    <li id="fn:2">
      <p><a href="https://conwaylife.com/wiki/OCA:Maze">LifeWifi - Maze</a> <a href="#fnref:2" class="reversefootnote" role="doc-backlink">&#8617;</a></p>
    </li>
    <li id="fn:3">
      <p>Hedge mazes in particular always have the <em>other</em> kind of branch, though. <a href="#fnref:3" class="reversefootnote" role="doc-backlink">&#8617;</a></p>
    </li>
  </ol>
</div>]]></content><author><name>Jacob Garby</name></author><category term="blog" /><summary type="html"><![CDATA[Source on GitHub]]></summary></entry><entry><title type="html">The First Post</title><link href="/blog/2023/07/23/The-first-post.html" rel="alternate" type="text/html" title="The First Post" /><published>2023-07-23T00:00:00+00:00</published><updated>2023-07-23T00:00:00+00:00</updated><id>/blog/2023/07/23/The-first-post</id><content type="html" xml:base="/blog/2023/07/23/The-first-post.html"><![CDATA[<p>Hello! After spending a couple of days messing with CSS and working out how to use Jekyll, I’ve got this website running.</p>

<p>I plan on posting about anything I happen to find interesting, which will hopefully in the near future consist of working out the design for a kernel I’m going to make. I also have a firefox bookmark folder full of some interesting and cool papers I found, which I plan to write a bit about.</p>

<p>Hopefully this website will be an enjoyable experience.</p>]]></content><author><name>Jacob Garby</name></author><category term="blog" /><summary type="html"><![CDATA[Hello! After spending a couple of days messing with CSS and working out how to use Jekyll, I’ve got this website running.]]></summary></entry></feed>